
1. Use Styles + Brand Kits to Stay Consistent (and Look Pro)
If you’re working on building a brand, whether it’s for your business or yourself, visual consistency is one of the easiest ways to stand out and be remembered. Think about brands like Apple or Nike. You can spot their content right away, not just because of their logos, but also because their colors, fonts, and overall look always remain consistent. That kind of recognition doesn’t happen by accident, and Canva makes it incredibly easy to achieve with its Brand Kit and Styles tools.
Getting Started with Canva’s Brand Kit
To set up your Brand Kit, head over to your Canva homepage and click on “Brand Hub.” From there, you’ll want to upload a few key things:
- Your primary and secondary logos
- Your brand’s color palette (using hex codes helps keep things super accurate)
- Your fonts for headings, subheadings, and body copy
If you’re using Canva Pro, you can actually create multiple Brand Kits. This is a huge time-saver if you manage more than one brand, work with clients, or sell templates.
Once your Brand Kit is set up, Canva keeps it handy inside your account. So every time you start a new design, your brand elements are right there waiting for you.
Using the Styles Panel to Speed Things Up:
- While editing any design, click on “Styles” in the left toolbar.
- Choose a saved brand palette or font combination.
- Apply to the entire design in one click.
When you’re editing a design, look to the left-hand toolbar and click on “Styles.” This is where the magic happens. You can instantly apply your saved color palette and font combo to your design in just one click. No need to hunt down the right shade of blue or remember which font you used last time.
Why This Saves Time:
- No more manually picking colors or scrolling for fonts.
- Avoids inconsistent designs and last-minute changes.
- Makes creating cohesive posts, stories, documents, or presentations a breeze.
You’ll never have to manually pick colors or scroll through fonts again. It helps you avoid those small inconsistencies that can make your content look all over the place. Whether you’re making Instagram posts, updating a slide deck, or designing a lead magnet, everything stays visually on-brand, and it takes way less time.
Real-Life Example:
This tip alone can cut your design time by 50%, while increasing brand trust and visual professionalism. Imagine you’re designing a weekly quote post for Instagram. Instead of starting from scratch each time, just open your branded Canva file, apply your brand’s style from the Styles tab, drop in the new quote, and export. That’s it. You’re done in minutes.
- Open your branded Canva file.
- Apply your brand’s style from the Styles tab.
- Update the quote and export — done in minutes.
This one change can cut your design time in half and make everything you create look more polished and trustworthy, even if you’re not a designer.
2. Reuse Design Assets (Make One Template to Rule Them All)
Think about your favorite coffee shop. Now imagine walking in one day to find a new menu style, different fonts, unfamiliar packaging, and colors that don’t match anything you’ve seen before. You’d probably feel a little confused, right? That same inconsistency can show up in your content when you design everything from scratch.
Templates help you stay consistent, save time, and make your brand feel more trustworthy. Instead of starting over every time, create a few go-to designs that you can use again and again. Think of them like your brand’s recipe cards. All you have to do is update the ingredients, and you’re good to go.
Templates = Time Saved + Trust Built
Instead of building graphics from zero every time, create “template families” that suit your content needs. You can duplicate them, rename the file, and plug in new content.
What Templates Should You Make?
| Content Type | Template Ideas |
| Quote post, carousel, product teaser | |
| YouTube | Thumbnail, intro/outro screens |
| Email Marketing | Header image, promo graphic, button banner |
| Courses/Workshops | Slide deck title, list slide, quote slide |
| Digital Products | Workbook page, checklist, cover page |
How to Build Your Templates
Start with one master layout. Choose your brand colors and fonts, keep margins and spacing consistent, and use placeholders for photos or product images. Once that layout feels right, save it. When you need to create something new, just duplicate the file, give it a new name, and swap out the content.
This simple workflow helps you avoid design burnout and keeps everything looking polished. You won’t need to remember which font goes where or worry about lining up text. It’s all already set.
If you’re a Canva Pro user, take advantage of the Resize tool. It lets you change your design size in just a few clicks. You could turn an Instagram post into a Pinterest pin or a YouTube thumbnail without having to start all over again.
Once your templates are ready, you’ll find that batching your content becomes quicker and way less stressful. You can focus more on planning and selling, and less on dragging boxes around a screen.
Step-by-Step Template Strategy:
- Create a master layout with your:
- Brand colors and fonts
- Consistent margin and spacing
Proper image placeholder
- Duplicate the file before each use (never overwrite your master).
- Update only the text or images needed.
This means your posts, emails, and products start with a professional design, and you never waste time picking fonts or resizing boxes again.
Advanced Tip:
Use the “Resize” feature (Pro only) to adapt a template into other formats. For example, turn an Instagram post into a Pinterest pin or YouTube thumbnail in one click. There’s no need to redesign.
Outcome:
You’ll batch content faster, build stronger visual branding, and dramatically reduce design fatigue. More time for strategy, sales, and rest!
3. Use a 1-Page Brand Board to Simplify Your Entire Workflow
This tip is about more than just keeping things pretty. A one-page brand board helps you work faster, stay focused, and hand things off to someone else without a million explanations.
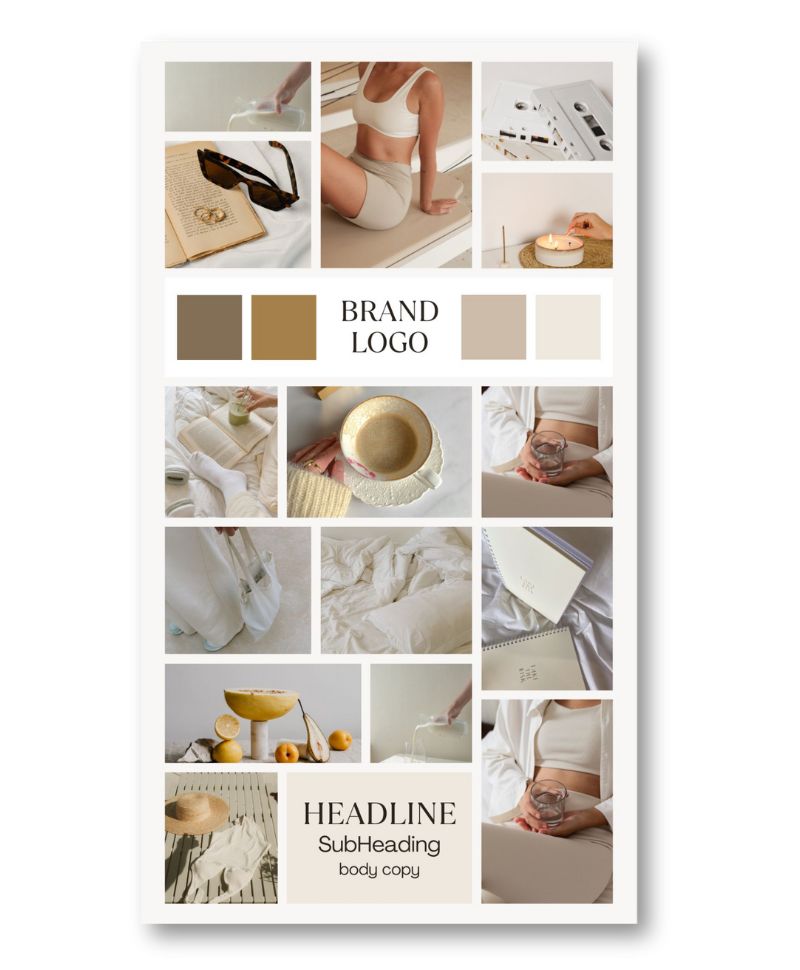
What Is a Canva Brand Board?
It’s a single Canva design that shows everything someone would need to understand your brand. You can think of it like your brand’s style cheat sheet.
What to Include on a Brand Board:
| Element | Details to Add |
| Logos | Main, alternate, icon/favicon |
| Color Palette | Include hex codes + usage tips |
| Typography | Heading, subheading, body fonts |
| Image Style Guide | Sample imagery, mockups, icons |
| Tone & Voice Notes | “Friendly but smart” / “Minimal, modern” etc. |
Why It’s So Helpful
You’ll always have a quick reference for your style, so you don’t waste time guessing. It also makes it easy to bring in help. Whether it’s a virtual assistant, a designer, or a team member, your brand board becomes their guide.
Even better, it helps reduce decision fatigue. Instead of second-guessing your design choices, you’ll know exactly what direction to go in every time.
Why It Works:
- Fast reference: No need to dig through files for your hex codes or logos.
- Delegation-ready: Perfect for handing off to a VA, graphic designer, or team member.
- Reduces design anxiety: Clear direction leads to confident execution.
How to Create One in Canva:
- Open a blank A4 or letter-sized Canva file.
- Use grids to organize logos, fonts, and color swatches.
- Label each section clearly.
- Add notes or examples (like your favorite Instagram post or product cover).
- Save it as a template for future edits.
Having this one file ready will save you hours and make every design decision easier.
Bonus Tip:
Link this board in your Notion dashboard, Google Drive, or project management tools (like Trello, ClickUp, or Asana).
Once your brand board is set up, your content creation will shift from “guess and check” to “plug and play.” Every design decision is grounded in one visual map.
Frequently Asked Questions (FAQs)
1. What is the Canva Brand Kit, and do I need Canva Pro to use it?
The Canva Brand Kit is a built-in tool that helps you store and organize your brand identity inside Canva. You can upload your logo(s), create a cohesive color palette, and set your default fonts for headings, subheadings, and body text.
- Free users can save one brand’s color palette and font combination.
- Pro users get access to multiple brand kits, the ability to upload custom fonts, and organize assets more thoroughly.
Bottom line: Canva Pro is ideal for anyone managing more than one brand, freelancing, or needing to delegate design work.
2. How can I make my Canva designs look more professional with minimal effort?
Start by using a pre-set brand kit and apply it through the Styles panel. This makes your colors and fonts consistent across all designs. Stick to 1-2 fonts, a set palette, and consistent layout margins. Avoid clutter and focus on a clear hierarchy in text.
Bonus tip: Use high-quality imagery and align elements properly using Canva’s built-in guides and snapping tools.
3. How do I reuse templates in Canva without cluttering my workspace?
Here’s how to manage this efficiently:
- Create a folder in Canva called “Templates”.
- Store your frequently used layouts there: social media posts, product promo graphics, eBooks, thumbnails, etc.
- Instead of editing a template directly, duplicate it first. That way, your original layout remains intact.
This habit not only speeds up design but keeps your workspace tidy and your templates reusable indefinitely.
4. Can I share my Canva Brand Board or templates with a VA or team?
Yes! Canva makes it incredibly easy to collaborate:
- Use the “Share” button to copy a view/edit link.
- Or create a Team folder and assign access to specific team members.
- You can also assign roles, giving editing rights only to those who need it.
For virtual assistants or social media managers, a clear brand board + set of templates makes onboarding lightning-fast.
5. What’s the difference between a Brand Kit and a Brand Board?
- A Brand Kit is a Canva feature where you upload and store fonts, logos, and colors.
- A Brand Board is a visual representation (a Canva design file) that lays out your brand’s identity — useful for humans, not just software.
The Brand Kit helps Canva design for you. The Brand Board helps you (or your team) design like you.
6. How do I get your free Canva Brand Board Template?
To get your copy of the Free Canva Brand Board Template, simply click the button or opt-in form below.
Once downloaded, you can:
- Add your logos, fonts, and colors
- Customize it to match your vibe
- Save it as your visual guide for future content
It’s simple, powerful, and saves you hours of guesswork every month.
Conclusion: Design Smarter, Not Longer
Canva was built to simplify design, but without the right tools and systems, even Canva can become overwhelming.
The good news? A few small shifts like saving your Brand Kit, using templates, and organizing your assets with a 1-page brand board can transform your workflow from frantic to focused.
Here’s what you’ve learned:
- How to set up and apply your Brand Kit with one click
- Why reusable templates save time and boost visual consistency
- The game-changing power of a one-page Brand Board
These aren’t just time-savers. They’re confidence boosters. They make you look and feel more professional, more organized, and more in control of your brand.
So, what’s next?
- Download your free Brand Board template
- Set up your Canva Brand Kit (or audit your current one)
- Build a small set of templates you can reuse weekly
You don’t need to be a designer to look like one. Just smart systems and a few minutes of setup.
Related Posts:
- Canva Licensing Explained: A Complete Guide to Free, Pro, and Enterprise Use
- My Top 3 Canva Font Pairings This Month (With Free Templates!)
- How I Finally Nailed My Brand Design (Without Overthinking Everything)
- 5 Common Font Pairing Mistakes (and What to Do Instead)
- 3 Canva Time-Saving Tips You’ll Wish You Knew Sooner
- How to Schedule Pinterest Pins Directly from Canva with Tailwind’s New Tool
- How to Upload Fonts to Canva + Video Tutorials: (Pro, Mobile & Fixes for Every Issue)


Leave a Reply